Fiber Cement Shake Siding Installation Guide
Fiber cement shake siding installation offers a beautiful and durable exterior for your home. This guide walks you through each step, from initial preparation to the finishing touches, equipping you with the knowledge and confidence to tackle this rewarding project. We’ll explore the advantages of fiber cement over other siding materials, delve into the installation process, and address common questions to ensure a smooth and successful outcome. Get ready to transform your home’s curb appeal!
This comprehensive guide covers everything from choosing the right tools and materials to mastering techniques for cutting, fitting, and securing the siding. We’ll also provide helpful tips for maintaining your new siding, ensuring its longevity and beauty for years to come. Whether you’re a seasoned DIYer or a first-time installer, this guide will be your invaluable resource.
Introduction to Fiber Cement Shake Siding
Fiber cement shake siding offers a compelling alternative to traditional wood shakes and other siding materials, boasting a blend of durability, aesthetics, and low-maintenance characteristics. Its popularity stems from its ability to mimic the natural beauty of wood shakes while significantly exceeding their lifespan and requiring less upkeep. This makes it a cost-effective and attractive choice for homeowners seeking a long-lasting and visually appealing exterior.
Fiber cement shake siding is a composite material made from a mixture of cement, cellulose fibers, and other additives. This unique composition grants it superior strength and resistance to various environmental factors, including fire, insects, and rot, unlike its wood counterpart. The resulting product is incredibly durable and capable of withstanding harsh weather conditions for decades with minimal deterioration.
Fiber Cement Shake Siding Characteristics and Benefits
Fiber cement shake siding provides several key advantages over other siding options. Its inherent fire resistance makes it a safer choice for homes in areas prone to wildfires. Unlike wood, it’s impervious to insect infestation and rot, eliminating the need for costly treatments and repairs. Furthermore, its durability translates to a significantly longer lifespan compared to vinyl or aluminum siding, resulting in long-term cost savings. The material’s resistance to fading and discoloration ensures its aesthetic appeal endures for years. Finally, fiber cement shakes offer excellent insulation properties, contributing to energy efficiency.
Fiber Cement Shake Siding Styles and Textures
A wide variety of styles and textures are available in fiber cement shake siding, allowing homeowners to achieve a specific aesthetic for their homes. Manufacturers offer profiles that closely replicate the appearance of natural wood shakes, with variations in thickness, length, and edge detailing. Some products feature a deeply textured surface, mimicking the rough-hewn look of hand-split shakes, while others provide a smoother, more refined appearance. Color options are extensive, ranging from natural earth tones to bolder, more contemporary hues. This allows for a high degree of customization to match various architectural styles and personal preferences. For example, a home with a rustic design might benefit from deeply textured, dark brown shakes, whereas a modern home could utilize smoother, lighter-colored options.
A Brief History of Fiber Cement Shake Siding
Fiber cement siding, in its various forms, has been used in construction for over a century. Early iterations were less refined, but advancements in manufacturing techniques have led to the development of highly realistic and durable shake-siding profiles. The increased demand for low-maintenance, fire-resistant, and aesthetically pleasing exterior cladding has fueled innovation in the fiber cement industry. Modern fiber cement shake siding represents a significant improvement over its predecessors, incorporating advanced formulations and manufacturing processes to enhance durability, color consistency, and ease of installation. The material has become a popular choice for both residential and commercial applications, showcasing its versatility and enduring appeal.
Preparation for Installation
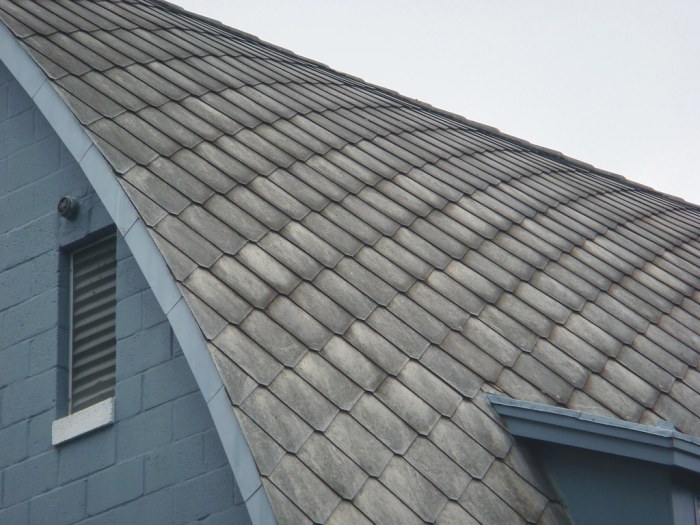
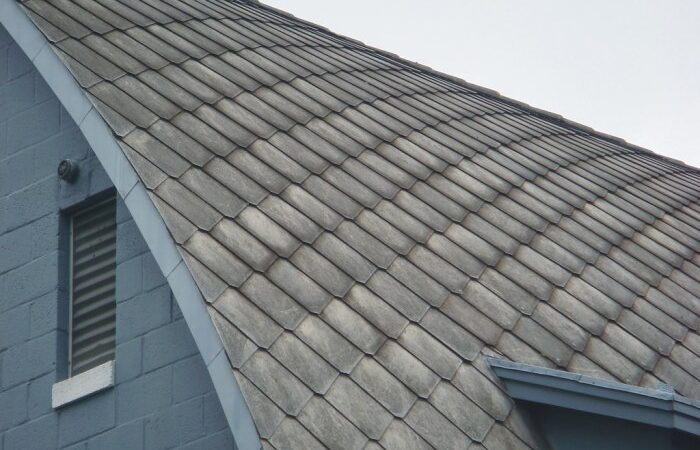
Source: staticflickr.com
Proper preparation is crucial for a successful fiber cement shake siding installation. Taking the time to gather the necessary tools and materials, and to properly prepare the wall surface, will save you time and effort in the long run and ensure a long-lasting, beautiful finish. Ignoring these steps can lead to problems such as uneven siding, gaps, and premature deterioration.
Tools and Materials
Before beginning your fiber cement shake siding installation, it’s essential to have all the necessary tools and materials readily available. This will streamline the process and prevent delays. The quantities listed below are estimates and may vary depending on the size of your project.
| Tools | Materials | Quantity (Estimate) | Notes |
|---|---|---|---|
| Measuring Tape | Fiber Cement Shakes | Based on the square footage of the wall area | Ensure you order extra to account for cuts and waste. |
| Level | Starter Strip | 1 per course | Provides a straight and even base for the first row of shakes. |
| Circular Saw with Fine-Toothed Blade | Caulk | 1-2 tubes | For sealing gaps and joints. |
| Jigsaw | Nails or Screws | Based on shake quantity and installation method | Choose nails or screws appropriate for fiber cement. |
| Hammer or Drill | Primer | Based on the wall surface area | Use a primer specifically designed for fiber cement. |
| Safety Glasses | Wood Furring Strips (if needed) | As needed for uneven surfaces | Used to create a level surface for siding installation. |
| Work Gloves | Flashing (if needed) | As needed for window and door openings | Protects against water intrusion. |
| Utility Knife | Paintable Caulk (optional) | As needed | For filling nail holes and gaps after installation. |
Wall Surface Preparation
Proper wall surface preparation is paramount for a successful siding installation. This involves cleaning, repairing any damage, and applying a primer. A clean, smooth, and primed surface ensures proper adhesion of the fiber cement shakes and prevents future problems.
Cleaning involves removing any loose debris, dirt, old paint, or other materials from the wall surface. Use a wire brush, scraper, and pressure washer (if appropriate for the wall material) to achieve a clean surface. Repairing damaged areas involves filling cracks or holes with a suitable patching compound, allowing it to dry completely, and sanding smooth. Finally, apply a primer specifically formulated for fiber cement siding. This will help ensure proper adhesion and prevent moisture absorption.
Building Codes and Safety Precautions
Adhering to local building codes and implementing appropriate safety precautions are essential before commencing any installation. This ensures the project meets legal requirements and minimizes risks to workers. Consult your local building department for specific code requirements related to fiber cement siding installation. Always wear appropriate safety gear, including safety glasses, work gloves, and respiratory protection when cutting or handling fiber cement materials, as they can produce dust. Use appropriate fall protection if working at heights. Follow the manufacturer’s instructions for the specific fiber cement shake product being used.
Installation Process
Installing fiber cement shake siding requires careful planning and execution to ensure a durable and aesthetically pleasing finish. This process involves several key steps, from preparing the sheathing to securing the final piece of siding. Proper techniques are crucial for achieving a professional-looking result and maximizing the longevity of your siding.
The installation process generally follows a predictable sequence, but always refer to the manufacturer’s specific instructions for your chosen product. These instructions may contain crucial details and recommendations that vary depending on the brand and type of fiber cement shake.
Starting the Installation
Before you begin installing the siding, it’s important to establish a consistent starting point and ensure proper alignment. This will help maintain a uniform look throughout the project. Accurate measurements and careful planning are key to success.
- Begin installation at a corner or a visually prominent area, ensuring a straight and level starting line. This will serve as a reference point for all subsequent siding pieces.
- Install starter strips or courses at the bottom of the wall, providing a level base for the remaining siding. These starter pieces should be securely fastened and aligned perfectly.
- Use a level and measuring tape frequently to verify alignment and prevent cumulative errors that can lead to noticeable inconsistencies in the finished product. A slight deviation early on can magnify significantly as the installation progresses.
Cutting and Fitting Around Obstructions
Windows, doors, and corners present unique challenges. Precise cutting and fitting are essential to maintain a clean, professional appearance and ensure proper water management.
- For windows and doors, measure carefully and cut the siding to fit snugly around the frames. Use a sharp utility knife or a circular saw with a fine-toothed blade for clean cuts. Pre-drilling pilot holes are recommended to prevent cracking.
- Use a coping saw or jigsaw for intricate cuts around complex architectural details. Take your time and make multiple test cuts if necessary to ensure a perfect fit.
- At corners, miter the siding pieces at a 45-degree angle to create a neat and seamless transition. This requires precise measurement and cutting to ensure a tight fit and avoid gaps.
- Consider using J-channel or other trim pieces to simplify installation around windows and doors, providing a clean finish and facilitating easier siding alignment.
Fastening and Alignment, Fiber cement shake siding installation
Secure fastening and proper spacing are critical for both the structural integrity and the aesthetic appeal of the finished siding. Using the correct fasteners and techniques will prevent damage and ensure long-lasting performance.
- Use galvanized or stainless steel nails or screws specifically designed for fiber cement siding. Avoid using nails that are too long, which could penetrate the sheathing and potentially damage the underlying structure.
- Maintain consistent spacing between siding pieces, as specified by the manufacturer. This spacing allows for expansion and contraction due to temperature fluctuations and prevents buckling or warping.
- Fasten each piece securely, ensuring that the nails or screws are driven straight and flush with the surface of the siding. Avoid overdriving fasteners, which can cause cracking.
- Use a nail gun for efficiency and consistency in fastening, but be careful to avoid driving nails too deep. Always check the depth of penetration before moving to the next fastener.
Finishing Touches and Maintenance
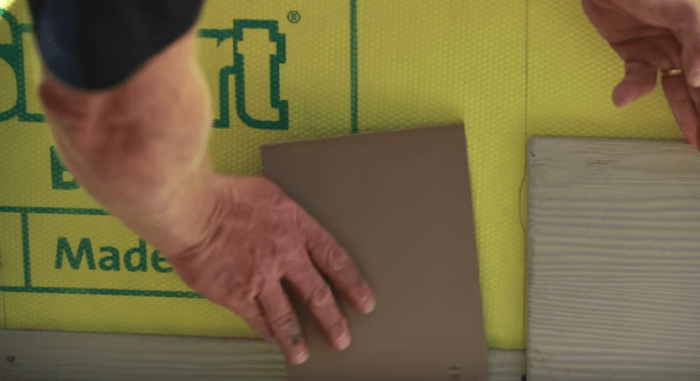
Source: allurausa.com
Proper finishing touches and regular maintenance are crucial for ensuring the longevity and aesthetic appeal of your fiber cement shake siding. These final steps will protect your investment and help maintain its beauty for years to come. Neglecting these aspects can lead to premature deterioration and costly repairs.
Caulking and Sealant Application
Applying caulking and sealant is a critical step in weatherproofing your fiber cement shake siding. This prevents water from penetrating the seams and causing damage to the underlying structure of your home. Focus on areas where water is most likely to enter, such as around windows, and doors, and where the siding meets other building materials. Choose a high-quality, exterior-grade caulk that is compatible with fiber cement. Before applying, ensure the surfaces are clean, dry, and free of dust or debris. Apply the caulk in a smooth, continuous bead, ensuring complete coverage of the joint. Tool the caulk smoothly with a wet finger or caulk tool for a neat, professional finish. Allow the caulk to fully cure before exposing it to rain or extreme temperatures. Regular inspection of caulking is important; re-caulking every few years will prevent leaks.
Cleaning and Maintenance Procedures
Regular cleaning is essential to preserve the appearance and longevity of your fiber cement shake siding. Dirt, mildew, and algae can accumulate over time, affecting the siding’s aesthetic appeal and potentially causing damage. For routine cleaning, a simple solution of water and mild detergent applied with a soft-bristled brush is usually sufficient. Rinse thoroughly with clean water to remove all traces of detergent. For stubborn stains or mildew, consider using a pressure washer, but maintain a safe distance to avoid damaging the siding. Always test any cleaning solution in an inconspicuous area first. Avoid harsh chemicals or abrasive cleaners, as these can damage the surface of the fiber cement. Annual cleaning is recommended, more frequently in areas with high humidity or pollution.
Common Installation and Post-Installation Issues
Several issues can arise during or after the installation of fiber cement shake siding. Addressing these problems promptly will prevent further damage and ensure the longevity of your siding.
| Problem | Cause | Solution |
|---|---|---|
| Cracked or Broken Shakes | Improper handling during installation, impact damage, or faulty manufacturing. | Replace damaged shakes. Exercise caution during handling and installation to avoid further damage. |
| Water Leakage | Inadequate caulking, gaps between shakes, or damaged flashing. | Inspect and re-caulk all seams and joints. Replace damaged flashing. Address any gaps in the siding. |
| Mildew or Algae Growth | High humidity, lack of proper ventilation, or infrequent cleaning. | Clean the siding regularly using a suitable cleaning solution. Improve ventilation around the house. |
| Nail Pops | Improper nailing techniques, expansion, and contraction of the siding. | Carefully countersink nails and use appropriate fasteners. Use corrosion-resistant nails. |
Cost and Budgeting
Planning the budget for your fiber cement shake siding installation is crucial for a smooth and financially responsible project. Understanding the various cost components and potential influencing factors will help you stay on track and avoid unexpected expenses. This section will provide a sample budget breakdown and discuss factors that affect the overall cost.
Sample Budget Breakdown
Accurately estimating the cost of your fiber cement shake siding project requires careful consideration of several factors. The following table provides a sample budget breakdown for a hypothetical 1500 sq ft home, but remember that your actual costs may vary. These figures are estimates and should be verified with local contractors and suppliers.
| Cost Category | Estimated Cost | Notes |
|---|---|---|
| Materials (Fiber Cement Shakes, Fasteners, Flashing, etc.) | $8,000 – $12,000 | Price varies based on chosen brand, quality, and quantity. |
| Labor (Installation, Prep Work) | $7,000 – $10,000 | Labor costs are influenced by project complexity, location, and contractor rates. |
| Permits and Inspections | $500 – $1,000 | Permit fees vary widely by location and project scope. |
| Waste Removal | $200 – $500 | Costs depend on the amount of waste generated. |
| Contingency (Unexpected Costs) | $1,000 – $2,000 | Always allocate a buffer for unforeseen issues. |
| Total Estimated Cost | $16,700 – $25,500 | This is a broad estimate and can significantly vary. |
Cost Comparison with Other Siding Options
Fiber cement shake siding sits at a mid-range price point compared to other siding materials. Vinyl siding is generally the least expensive, while options like brick or stone are considerably more costly. Wood siding, while aesthetically pleasing, can require significant maintenance and may end up costing more in the long run due to repairs and repainting. The longevity and low-maintenance nature of fiber cement often make it a cost-effective choice over time.
Factors Influencing Overall Cost
Several factors can significantly influence the final cost of your fiber cement shake siding project.
Project Size: Larger homes naturally require more materials and labor, leading to higher overall costs. A smaller project will, conversely, cost less.
Project Complexity: Intricate designs, multiple rooflines, or extensive trim work add complexity and increase labor costs. Simple installations are more budget-friendly.
Location: Labor rates and material costs vary geographically. Projects in areas with higher labor costs or limited access to materials will be more expensive.
Existing Siding Removal: If you’re replacing existing siding, the cost of removal and disposal will add to the overall project expense. This cost is dependent on the type of siding being removed and the ease of its removal.
Contractor Selection: Different contractors offer varying rates. Obtaining multiple quotes from reputable contractors is essential for finding the best value.
Visual Examples

Source: dreamworxexteriors.com
Seeing fiber cement shake siding in action can greatly aid in your decision-making process. The following examples illustrate the versatility of this material and how it can transform the look of a home. Remember that the final aesthetic is heavily influenced by factors such as color choice, installation pattern, and the overall architectural style of the house.
These examples highlight the diverse applications of fiber cement shake siding, showcasing how different design choices can create dramatically different overall effects. We’ll explore three distinct installations, emphasizing the interplay between siding, house style, and color palette.
Example 1: A Rustic Charm on a Cape Cod
This Cape Cod-style home, with its classic proportions and charming details, is beautifully complemented by a medium-brown fiber cement shake siding. The shakes are installed in a staggered pattern, creating a natural, textured look that evokes a sense of warmth and age. The color choice enhances the home’s inherent charm, recalling the natural tones of aged wood. Large, multi-paned windows are further emphasized by the deep shadow lines created by the siding’s texture. A lighter-colored trim, painted a creamy white, provides a crisp contrast and highlights architectural details like window frames and the front door. The overall effect is one of rustic elegance, perfectly suited to the home’s style.
Example 2: Modern Minimalism with a Gray Color Palette
In stark contrast to the previous example, this modern farmhouse utilizes a sleek, gray fiber cement shake siding. The shakes are installed in a more uniform pattern, emphasizing clean lines and a contemporary aesthetic. The consistent gray tones create a sense of calm and sophistication, perfectly reflecting the home’s minimalist design. Large expanses of glass are framed by the siding, creating a seamless transition between the interior and exterior. The absence of ornate detailing allows the siding’s texture to be the focal point, adding subtle visual interest without overpowering the home’s clean lines. A darker gray used for the trim adds a touch of depth and sophistication, enhancing the modern feel.
Example 3: A Victorian Revival with Deep, Rich Tones
This Victorian-era home showcases the dramatic impact of dark-colored fiber cement shake siding. A deep, charcoal gray, almost black, siding is used to create a bold, striking façade. The intricate detailing of the Victorian architecture is beautifully emphasized by the dark siding, which provides a strong contrast against the lighter-colored trim and window frames. The shakes are installed in a varied, slightly irregular pattern, echoing the home’s ornate details. The deep color adds a sense of mystery and grandeur, perfectly suited to the home’s opulent style. The result is a sophisticated and timeless aesthetic, showcasing the siding’s ability to enhance historical architectural styles.
Visual Impact of Different Siding Patterns and Installation Techniques
The visual impact of fiber cement shake siding is significantly influenced by the chosen installation pattern and technique. Careful consideration of these factors is crucial for achieving the desired aesthetic.
The following points detail how different installation choices can affect the overall appearance of the finished product.
- Staggered Pattern: Creates a more natural, rustic look, reminiscent of traditional wood shake siding. The varied lengths and overlaps add visual texture and depth.
- Uniform Pattern: Offers a cleaner, more modern aesthetic. The consistent spacing and alignment emphasize straight lines and create a sense of order.
- Random Pattern: Provides a unique, handcrafted look. The irregular spacing and lengths add visual interest and a touch of unpredictability.
- Vertical Installation: This creates a taller, more slender appearance for the home. It can also emphasize height and draw the eye upward.
- Horizontal Installation: Emphasizes the width of the home, creating a broader, more grounded look.
Closing Notes: Fiber Cement Shake Siding Installation

Source: signatureexteriorsinc.com
Installing fiber cement shake siding is a significant undertaking, but with careful planning and attention to detail, the results are truly stunning. This guide has provided a step-by-step approach to ensure a professional-looking finish. Remember to prioritize safety and always refer to manufacturer instructions. By following these guidelines and addressing any potential challenges proactively, you can enjoy the beauty and durability of your new fiber cement shake siding for many years to come. Your transformed home will be a testament to your hard work and dedication!
Detailed FAQs
What is the lifespan of fiber cement shake siding?
With proper installation and maintenance, fiber cement shake siding can last 50 years or more.
Can I install fiber cement shake siding myself?
While possible for DIYers with some experience, complex installations might benefit from professional help. Always assess your skill level before starting.
How much does fiber cement shake siding cost per square foot?
The cost varies based on factors like brand, style, and location. Expect a range from $5 to $15+ per square foot, excluding labor.
Is fiber cement shake siding fire-resistant?
Yes, fiber cement siding is highly resistant to fire, offering excellent protection for your home.
How do I clean fiber cement shake siding?
Regular cleaning with water and a soft brush is usually sufficient. For tougher stains, use a mild detergent solution.
Comments are closed.